Friday, April 20, 2018

Setting up Application Version for ADF Application through build.xml and Jenkins Build


Our favorite Oracle  Middleware  author Andrejusb has explained how to setup ear verion for ADF Application in following blog.

http://andrejusb.blogspot.com/2011/12/how-to-set-ear-version-for-adf.html

Here he talks about providing  Weblogic-Application-Version parameter in manifest File.

This example, i did the same except, the requirement was to get the version though application built using build.xml (ant script) and we can run through Jenkins

We create a template Manifest file here using which we create the manifest file.

In this example we would also perform operation to increment the build version for the application in ant script

Steps:

1. Create a MANIFEST.TEMPLATE.MF file in src\META-INF folder with following entries:

Manifest-Version: 1.0
Weblogic-Application-Version: @Weblogic-Application-Version@
Release-No: @Release-No@
Build-No: @Build-No@
Built-By: @Built-By@
Built-Date: @Built-Date@


2. Make the entry in build.xml as:

 <target name="genEAR" description="Deploy JDeveloper profiles"
          depends="prepareVersion">

    <copy file="${manifest.file.directory}/MANIFEST.TEMPLATE.MF"
          tofile="${manifest.file.directory}/MANIFEST.MF" overwrite="true">
      <filterset>
        <filter token="Weblogic-Application-Version"
                value="${eonoms.build.major}.${eonoms.build.minor}.${eonoms.build.patch}"/>
        <filter token="Release-No"
                value="${eonoms.build.major}.${eonoms.build.minor}.${eonoms.build.patch}"/>
        <filter token="Build-No" value="${eonoms.build.number}"/>
        <filter token="Built-By" value="${eonoms.build.user}"/>
        <filter token="Built-Date" value="${eonoms.build.date}"/>
      </filterset>
    </copy>
    <taskdef name="ojdeploy"
             classname="oracle.jdeveloper.deploy.ant.OJDeployAntTask"
             uri="oraclelib:OJDeployAntTask" classpathref="lib.path"
             classpath="${oracle.jdeveloper.ant.library}"/>
    <ora:ojdeploy xmlns:ora="oraclelib:OJDeployAntTask"
                  executable="${oracle.jdeveloper.ojdeploy.path}"
                  ora:buildscript="${oracle.jdeveloper.deploy.dir}/ojdeploy-build.xml"
                  ora:statuslog="${oracle.jdeveloper.deploy.dir}/ojdeploy-statuslog.xml">
      <ora:deploy>
        <ora:parameter name="workspace"
                       value="${oracle.jdeveloper.workspace.path}"/>
        <ora:parameter name="profile"
                       value="${oracle.jdeveloper.deploy.profile.name}"/>
        <ora:parameter name="nocompile" value="false"/>
        <ora:parameter name="outputfile"
                       value="${oracle.jdeveloper.deploy.outputfile}__${Current_Date}"/>
      </ora:deploy>
    </ora:ojdeploy>
  </target>


 <target name="prepareVersion">
    <property name="header"
              value="##Semi auto Generated file - Read comments before any manual modifications and consult with app owners"/>
    <property environment="build_env"/>

      <entry key="eonoms.build.number" type="int" default="0001" operation="+"
             pattern="0000"/>
      <entry key="eonoms.build.date" type="date" value="now"/>
      <entry key="eonoms.build.user" type="string"
             value="${user.name}"/>
    </propertyfile>
  </target>

Here, the target prepareVersion populates the build version info. It also increments the version number by 1 for next release.

The build info prepared is fed to the target genEAR where it copies the entry to template file to Manifest.MF with replacement for tokens available in template.

3. This build.xml can be run through jenkins to prepare ADF ear with version number information to be deployed in weblogic server


Please please your questions in comments. If required i can share the necessary files/application
Friday, November 24, 2017

Creating ADF Model Project as Library to be reused in other Application

The requirement here was to reuse one of the Model Project in a different ADF application. The new application needed to use few of the view objects from already created in Model project of different application. For this purpose we created ADF Library JAR of the Model project and reused in the new application.

Please refer official Oracle link for more details

Steps:

First we shall create deployment profile for the existing Model Project

1. In the Project Properties dialog, select Deployment and then click New.

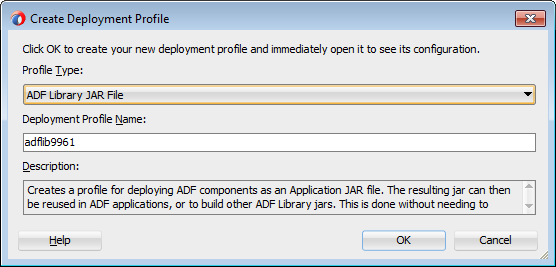
2. In the Create Deployment Profile dialog, select ADF Library JAR file for Profile Type, enter a name or accept the default name for Deployment Profile Name, and click OK.

Description of Figure 50-6 follows
3. In the Applications window, right-click the project and choose Deploy > deployment, where deployment is the name of the deployment profile.

4. The Jar would be available in <Applicatio_Home>/Model/deploy


Now we need to use this library in our new project.
Steps for the same:
5. In consuming project, from the main menu, choose Tools > Manage Libraries.

6. In the Manage Libraries dialog, click Load Dir.

7. In the Load Directory dialog, select the directory where the secondary JAR files are located and click Select. This should be the same location specified in Step 4.


8. Right-click the project and select Project Properties.

9. In the Project Properties window, select Libraries and Classpath and click Add Library.

10. In the Add Library dialog, select the library, click OK and then click OK again.


After this the view objects shall be available in new appmodule of the new Model project(If not, restart the Jdeveloper).

Please post further question in comments if you have any


Thursday, March 9, 2017

Get Selected Value and Id from selectOneChoice in ADF

I must confess that every time i come across this requirement i have to google for it.
I go across 10 different links before arriving at solution.

So i am writing this post for MY FUTURE REFERENCE, so i that i can go through the post and get an answer for me!!!

Problem:

Suppose i have a LOV populated as


Lets say the value/Id combination in the lov is:
10/A
20/B
30/C


I need to find a way to get both Id and value of the selected item.


Solution:

Lets assume the af:selectOneChoice  is populated as :


 <af:selectOneChoice value="#{bindings.TypeNameList.inputValue}"
                                              label="Role Type" autoSubmit="true"
                                              required="#{bindings.TypeNameList.hints.mandatory}"
                                              shortDesc="#{bindings.TypeNameList.hints.tooltip}"
                                              id="soc3">
                            <f:selectItems value="#{bindings.TypeNameList.items}"
                                           id="si3"/>
              </af:selectOneChoice>


The following will print the Value on the jspx page as:

<af:outputText value = "Id : #{bindings.TypeNameList.attributeValue}" id="ottext2" partialTriggers="soc3"/>


<af:outputText value = "Display Value: #{bindings.TypeNameList.selectedValue ne ' ' ? bindings.TypeNameList.selectedValue.attributeValues[1] : ''}"
                                         id="ot18" partialTriggers="soc3"/>


On Backing bean if you want to fetch them, follow this:


    /**Method to get value from Expression (EL)
     * @param data
     * @return
     */
    private String getValueFrmExpression(String data) {
        FacesContext fc = FacesContext.getCurrentInstance();
        Application app = fc.getApplication();
        ExpressionFactory elFactory = app.getExpressionFactory();
        ELContext elContext = fc.getELContext();
        ValueExpression valueExp =
            elFactory.createValueExpression(elContext, data, Object.class);
        String Message = null;
        Object obj = valueExp.getValue(elContext);
        if (obj != null) {
            Message = obj.toString();
        }
        return Message;
    }


and call it as :
getValueFrmExpression("#{bindings.TypeNameList.selectedValue}")


This might be a simple problem but i come across this all the time and struggle every time to get the value

Wednesday, October 19, 2016

Install-Configure Jenkins for ADF/Java/J2EE Application - Part 2

In the last post, i explained how to install, the jenkins with Admin Console.

This post deals mainly with configuring the jenkins to build projects.

I have split this post in 2 Sections, Section A explains the settings one shall perform in Jenkins Global settings, Section B will explain how to create a new item that would checkout the code from svn and prepare the jar/war files.


Section A: Manage Jenkins Settings

1. Set up JDK:
     Go to Manage Jenkins -- > Global Tool Configuration -- > JDK(Click on JDK installation)


    Set the JAVA_HOME property pointing to your JAVA_HOME as shown below

2. Set up Ant: I am building my projects using Ant build so i need to define the ANT properties for the Jenkins to use.

In the same section, if you scroll below, you can see ANT
Go to Manage Jenkins -- > Global Tool Configuration -- > ANT(Click on ANT installation) and set the ANT Properties as shown below


3. Set up Emails: In this example, i intend to send out email to list or recipients with build details every time a build activity happens. So i have configured the properties for the same

Go to Manage Jenkins -- > Configure System -- > Extended E-mail Notification


and update  following details


Your jenkins Setup is complete now.

Section B: Setting up project to be built using Jenkins

In this section i would try to Setup a project build in  Jenkins

1.Click on new Item in the top left of the screen:

2. The next screen would be something like:

Enter the project Name, select freestyle project and click OK in the bottom to go to the next screen

3. The Screen would look like following:

we need to update the required section from here

4.Go to General -- > Advance and update the following

This would instruct the Jenkins to checkout the code from svn to mentioned location

5. Go to Source Code Management and update the source code location with following details.

Note: you may add the credentials for subversion during 1st time
click on add(next to credentials)

6. Go to Build Environment and select "Delete workspace before build starts" so that everytime is build is requested fresh checkout happens

7. Go to Build Section, select invoke Ant (since in this example we are using Ant to create deployable artifact)


The svn path mentioned in step 5, shall have a build.xml and the target user wants to execute shall be mentioned in Ant Steps as following:

Note : Ant version was defined in Section A step 2

8. In the post build Action i need to send out an email to the recipients with the build update so add Editable Email Notification in Post build update as


Go to the advanced settings


Add a trigger as Always send email to recipient list


9. Your jenkins is ready now.
Select the project from home page and click on Build now.


The build would be ready in the local folder where the code is checked out  and as suggested in the build.xml file


The explanation is a bit lengthy but please post your questions in comment section in case you have any doubt, and i will try to answer the questions if any

Tuesday, October 18, 2016

Install-Configure Jenkins for ADF/Java/J2EE Application

Jenkins, is the most successful and widely used tool used for continuous integration.

Over next couple of tutorials i intend to help the developer working in various framework to use Jenkins in their application and align with industry standards.

Lets get started.

1. Download the Jenkins war from here

Note: the mentioned tutorial is specifically build on the this version of the jenkins, so please use this war for set up.

2. once the war is downloaded, go the the directory where the war is placed in command prompt

suppose the "jenkins.war" is placed in C:\Softwares\jenkins, in command prompt:

3. Run the following command:

java -jar jenkins.war --httpPort=9090

usually the port 8080 is busy so making the jenkins run on 9090

This command will create a folder named .jenkins in c:\user\<user_name> folder where all the configuration would be saved.
In case you want to start all over your jenkins, delete the folder .jenkins and start from step 3

the screen would prompt something like:


4. log on to http://localhost:9090/

screen will prompt to:


Since the jenkins is started for the first time, you must unlock the jenkins first, create admin user and proceed further

as suggested, the password can be found @ C:\Users\<user_name>\.jenkins\secrets\initialAdminPassword


5. proceeding further screen would be like this:


select "Install Suggested Pluing".


Next screen would be like:


6. Now the system prompts to create Admin user


After creating user, you may start using the jenkins

It will be available @ http://localhost:9090/


7. Once you close the command prompt, you will always have to start the jenkins using the java -jar option as suggested in step 3, but it would save the admin and other settings as long as .jenkins file is not deleted from user folder

you can also run the jenkins war on some local tomcat server.


Starting next tutorial, i will explain the Configuration of Jenkins to build the projects


Saturday, June 25, 2016

ADF : populating the bind variable from ViewObjectImpl Class

In ADF while working with view objects(Entity based or Readonly) user might be in need to populate the bind variable value from Security context or session scope. for this reason it can be populated easily in java class

Consider a scenario where the query to be executed is "Select * from <tablename> where userid is <logged in user>". Such scenario can be handled via regexs (since i am not very good with regex so i decided to populate such value in java class which gives me flexibility to get such values from security context or session scope and also i can modfiy  the values is needed using java APIs.


Steps.
1. create the bind variable and assign the value as expression as :
adf.object.viewObject.managerRoleIdFromSession


here the managerRoleIdFromSession is private string defined in the Impl class as:


    private String managerRoleIdFromSession;


    public void setManagerRoleIdFromSession(String managerRoleIdFromSession) {
        this.managerRoleIdFromSession = managerRoleIdFromSession;
    }

    public String getManagerRoleIdFromSession() {
        String managerRoleId="";
        Map sessionScope = ADFContext.getCurrent().getSessionScope();
        managerRoleId=sessionScope.get("Manager_roleId")!=null?sessionScope.get("Manager_roleId").toString():"";
        return managerRoleId;
    }

as demonstrated in the setter method user can use the necessary APIs to play around the variable and get desired output