Showing posts with label ADF. Show all posts

Friday, April 20, 2018

Setting up Application Version for ADF Application through build.xml and Jenkins Build


Our favorite Oracle  Middleware  author Andrejusb has explained how to setup ear verion for ADF Application in following blog.

http://andrejusb.blogspot.com/2011/12/how-to-set-ear-version-for-adf.html

Here he talks about providing  Weblogic-Application-Version parameter in manifest File.

This example, i did the same except, the requirement was to get the version though application built using build.xml (ant script) and we can run through Jenkins

We create a template Manifest file here using which we create the manifest file.

In this example we would also perform operation to increment the build version for the application in ant script

Steps:

1. Create a MANIFEST.TEMPLATE.MF file in src\META-INF folder with following entries:

Manifest-Version: 1.0
Weblogic-Application-Version: @Weblogic-Application-Version@
Release-No: @Release-No@
Build-No: @Build-No@
Built-By: @Built-By@
Built-Date: @Built-Date@


2. Make the entry in build.xml as:

 <target name="genEAR" description="Deploy JDeveloper profiles"
          depends="prepareVersion">

    <copy file="${manifest.file.directory}/MANIFEST.TEMPLATE.MF"
          tofile="${manifest.file.directory}/MANIFEST.MF" overwrite="true">
      <filterset>
        <filter token="Weblogic-Application-Version"
                value="${eonoms.build.major}.${eonoms.build.minor}.${eonoms.build.patch}"/>
        <filter token="Release-No"
                value="${eonoms.build.major}.${eonoms.build.minor}.${eonoms.build.patch}"/>
        <filter token="Build-No" value="${eonoms.build.number}"/>
        <filter token="Built-By" value="${eonoms.build.user}"/>
        <filter token="Built-Date" value="${eonoms.build.date}"/>
      </filterset>
    </copy>
    <taskdef name="ojdeploy"
             classname="oracle.jdeveloper.deploy.ant.OJDeployAntTask"
             uri="oraclelib:OJDeployAntTask" classpathref="lib.path"
             classpath="${oracle.jdeveloper.ant.library}"/>
    <ora:ojdeploy xmlns:ora="oraclelib:OJDeployAntTask"
                  executable="${oracle.jdeveloper.ojdeploy.path}"
                  ora:buildscript="${oracle.jdeveloper.deploy.dir}/ojdeploy-build.xml"
                  ora:statuslog="${oracle.jdeveloper.deploy.dir}/ojdeploy-statuslog.xml">
      <ora:deploy>
        <ora:parameter name="workspace"
                       value="${oracle.jdeveloper.workspace.path}"/>
        <ora:parameter name="profile"
                       value="${oracle.jdeveloper.deploy.profile.name}"/>
        <ora:parameter name="nocompile" value="false"/>
        <ora:parameter name="outputfile"
                       value="${oracle.jdeveloper.deploy.outputfile}__${Current_Date}"/>
      </ora:deploy>
    </ora:ojdeploy>
  </target>


 <target name="prepareVersion">
    <property name="header"
              value="##Semi auto Generated file - Read comments before any manual modifications and consult with app owners"/>
    <property environment="build_env"/>

      <entry key="eonoms.build.number" type="int" default="0001" operation="+"
             pattern="0000"/>
      <entry key="eonoms.build.date" type="date" value="now"/>
      <entry key="eonoms.build.user" type="string"
             value="${user.name}"/>
    </propertyfile>
  </target>

Here, the target prepareVersion populates the build version info. It also increments the version number by 1 for next release.

The build info prepared is fed to the target genEAR where it copies the entry to template file to Manifest.MF with replacement for tokens available in template.

3. This build.xml can be run through jenkins to prepare ADF ear with version number information to be deployed in weblogic server


Please please your questions in comments. If required i can share the necessary files/application

Friday, November 24, 2017

Creating ADF Model Project as Library to be reused in other Application

The requirement here was to reuse one of the Model Project in a different ADF application. The new application needed to use few of the view objects from already created in Model project of different application. For this purpose we created ADF Library JAR of the Model project and reused in the new application.

Please refer official Oracle link for more details

Steps:

First we shall create deployment profile for the existing Model Project

1. In the Project Properties dialog, select Deployment and then click New.

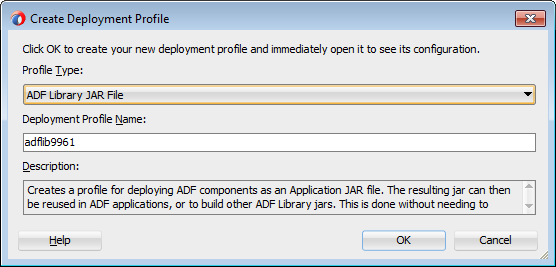
2. In the Create Deployment Profile dialog, select ADF Library JAR file for Profile Type, enter a name or accept the default name for Deployment Profile Name, and click OK.

Description of Figure 50-6 follows
3. In the Applications window, right-click the project and choose Deploy > deployment, where deployment is the name of the deployment profile.

4. The Jar would be available in <Applicatio_Home>/Model/deploy


Now we need to use this library in our new project.
Steps for the same:
5. In consuming project, from the main menu, choose Tools > Manage Libraries.

6. In the Manage Libraries dialog, click Load Dir.

7. In the Load Directory dialog, select the directory where the secondary JAR files are located and click Select. This should be the same location specified in Step 4.


8. Right-click the project and select Project Properties.

9. In the Project Properties window, select Libraries and Classpath and click Add Library.

10. In the Add Library dialog, select the library, click OK and then click OK again.


After this the view objects shall be available in new appmodule of the new Model project(If not, restart the Jdeveloper).

Please post further question in comments if you have any


Thursday, March 9, 2017

Get Selected Value and Id from selectOneChoice in ADF

I must confess that every time i come across this requirement i have to google for it.
I go across 10 different links before arriving at solution.

So i am writing this post for MY FUTURE REFERENCE, so i that i can go through the post and get an answer for me!!!

Problem:

Suppose i have a LOV populated as


Lets say the value/Id combination in the lov is:
10/A
20/B
30/C


I need to find a way to get both Id and value of the selected item.


Solution:

Lets assume the af:selectOneChoice  is populated as :


 <af:selectOneChoice value="#{bindings.TypeNameList.inputValue}"
                                              label="Role Type" autoSubmit="true"
                                              required="#{bindings.TypeNameList.hints.mandatory}"
                                              shortDesc="#{bindings.TypeNameList.hints.tooltip}"
                                              id="soc3">
                            <f:selectItems value="#{bindings.TypeNameList.items}"
                                           id="si3"/>
              </af:selectOneChoice>


The following will print the Value on the jspx page as:

<af:outputText value = "Id : #{bindings.TypeNameList.attributeValue}" id="ottext2" partialTriggers="soc3"/>


<af:outputText value = "Display Value: #{bindings.TypeNameList.selectedValue ne ' ' ? bindings.TypeNameList.selectedValue.attributeValues[1] : ''}"
                                         id="ot18" partialTriggers="soc3"/>


On Backing bean if you want to fetch them, follow this:


    /**Method to get value from Expression (EL)
     * @param data
     * @return
     */
    private String getValueFrmExpression(String data) {
        FacesContext fc = FacesContext.getCurrentInstance();
        Application app = fc.getApplication();
        ExpressionFactory elFactory = app.getExpressionFactory();
        ELContext elContext = fc.getELContext();
        ValueExpression valueExp =
            elFactory.createValueExpression(elContext, data, Object.class);
        String Message = null;
        Object obj = valueExp.getValue(elContext);
        if (obj != null) {
            Message = obj.toString();
        }
        return Message;
    }


and call it as :
getValueFrmExpression("#{bindings.TypeNameList.selectedValue}")


This might be a simple problem but i come across this all the time and struggle every time to get the value

Wednesday, October 19, 2016

Install-Configure Jenkins for ADF/Java/J2EE Application - Part 2

In the last post, i explained how to install, the jenkins with Admin Console.

This post deals mainly with configuring the jenkins to build projects.

I have split this post in 2 Sections, Section A explains the settings one shall perform in Jenkins Global settings, Section B will explain how to create a new item that would checkout the code from svn and prepare the jar/war files.


Section A: Manage Jenkins Settings

1. Set up JDK:
     Go to Manage Jenkins -- > Global Tool Configuration -- > JDK(Click on JDK installation)


    Set the JAVA_HOME property pointing to your JAVA_HOME as shown below

2. Set up Ant: I am building my projects using Ant build so i need to define the ANT properties for the Jenkins to use.

In the same section, if you scroll below, you can see ANT
Go to Manage Jenkins -- > Global Tool Configuration -- > ANT(Click on ANT installation) and set the ANT Properties as shown below


3. Set up Emails: In this example, i intend to send out email to list or recipients with build details every time a build activity happens. So i have configured the properties for the same

Go to Manage Jenkins -- > Configure System -- > Extended E-mail Notification


and update  following details


Your jenkins Setup is complete now.

Section B: Setting up project to be built using Jenkins

In this section i would try to Setup a project build in  Jenkins

1.Click on new Item in the top left of the screen:

2. The next screen would be something like:

Enter the project Name, select freestyle project and click OK in the bottom to go to the next screen

3. The Screen would look like following:

we need to update the required section from here

4.Go to General -- > Advance and update the following

This would instruct the Jenkins to checkout the code from svn to mentioned location

5. Go to Source Code Management and update the source code location with following details.

Note: you may add the credentials for subversion during 1st time
click on add(next to credentials)

6. Go to Build Environment and select "Delete workspace before build starts" so that everytime is build is requested fresh checkout happens

7. Go to Build Section, select invoke Ant (since in this example we are using Ant to create deployable artifact)


The svn path mentioned in step 5, shall have a build.xml and the target user wants to execute shall be mentioned in Ant Steps as following:

Note : Ant version was defined in Section A step 2

8. In the post build Action i need to send out an email to the recipients with the build update so add Editable Email Notification in Post build update as


Go to the advanced settings


Add a trigger as Always send email to recipient list


9. Your jenkins is ready now.
Select the project from home page and click on Build now.


The build would be ready in the local folder where the code is checked out  and as suggested in the build.xml file


The explanation is a bit lengthy but please post your questions in comment section in case you have any doubt, and i will try to answer the questions if any

Saturday, June 25, 2016

ADF : populating the bind variable from ViewObjectImpl Class

In ADF while working with view objects(Entity based or Readonly) user might be in need to populate the bind variable value from Security context or session scope. for this reason it can be populated easily in java class

Consider a scenario where the query to be executed is "Select * from <tablename> where userid is <logged in user>". Such scenario can be handled via regexs (since i am not very good with regex so i decided to populate such value in java class which gives me flexibility to get such values from security context or session scope and also i can modfiy  the values is needed using java APIs.


Steps.
1. create the bind variable and assign the value as expression as :
adf.object.viewObject.managerRoleIdFromSession


here the managerRoleIdFromSession is private string defined in the Impl class as:


    private String managerRoleIdFromSession;


    public void setManagerRoleIdFromSession(String managerRoleIdFromSession) {
        this.managerRoleIdFromSession = managerRoleIdFromSession;
    }

    public String getManagerRoleIdFromSession() {
        String managerRoleId="";
        Map sessionScope = ADFContext.getCurrent().getSessionScope();
        managerRoleId=sessionScope.get("Manager_roleId")!=null?sessionScope.get("Manager_roleId").toString():"";
        return managerRoleId;
    }

as demonstrated in the setter method user can use the necessary APIs to play around the variable and get desired output

ADF : populating the bind variable from ViewObjectImpl Class

In ADF while working with view objects(Entity based or Readonly) user might be in need to populate the bind variable value from Security context or session scope. for this reason it can be populated easily in java class

Consider a scenario where the query to be executed is "Select * from <tablename> where userid is <logged in user>". Such scenario can be handled via regexs (since i am not very good with regex so i decided to populate such value in java class which gives me flexibility to get such values from security context or session scope and also i can modfiy  the values is needed using java APIs.


Steps.
1. create the bind variable and assign the value as expression as :
adf.object.viewObject.managerRoleIdFromSession


here the managerRoleIdFromSession is private string defined in the Impl class as:


    private String managerRoleIdFromSession;


    public void setManagerRoleIdFromSession(String managerRoleIdFromSession) {
        this.managerRoleIdFromSession = managerRoleIdFromSession;
    }

    public String getManagerRoleIdFromSession() {
        String managerRoleId="";
        Map sessionScope = ADFContext.getCurrent().getSessionScope();
        managerRoleId=sessionScope.get("Manager_roleId")!=null?sessionScope.get("Manager_roleId").toString():"";
        return managerRoleId;
    }

as demonstrated in the setter method user can use the necessary APIs to play around the variable and get desired output

Wednesday, January 27, 2016

Solution to ADFC-0619: Authorization check failed

Problem Statement:
My ADF Application, with security implemented through jazn-data when deployed on Weblogic box, the authorization does not happen and i often i receive
oracle.adf.controller.security.AuthorizationException: ADFC-0619: Authorization check failed: 'oracle.jbo.uicli.binding.JUFormDef@d856cd' 'VIEW'.

This issue has been discussed @:
https://community.oracle.com/message/9646751
http://oracle.developer-works.com/article/4786269/ADFC-0619%3A+Authorization+check+failed%3A+'homePageDef'+'VIEW'+-+Solved

Root Cause:
The root cause for the issue is when an ADF application with security enabled is deployed through weblogic console the <Domain_home>/config/fmwconfig/system-jazn-data.xml do not get updated and hence the server is not aware of the security policies and the page remains unavailable

Solution:

I was stuck with this issue for more than 2 weeks and following solutions were implemented:

1. Instead of going for Authentication and Authorization go for Authentication only


Not sure why this works, but it induces a new issue.
Issue with this approach if if trying to access a page with permission given to anonymous-role, the application would route to the login page in this case and user is forced to login

2. Try to deploy the application on server through Jdeveloper


This solves the issue but in most of the cases the prod servers wont be available for developers to access and makes this approach unpractical

3. Deploy through em console

This approach finally worked in my case. Deploy the application on Admin Server through em console. Make sure in Deployment Settings: Click on Configure Application Security to modify the default settings and in Configure Application Security provide following:

Select Application Policy Migration as “Append”.
Uncheck the “Remove Policies during Application undeployment”
Provide Application setting id as "<Application_name>"
Click Apply


NOTE: THIS STEP WOULD UPDATE THE system-jazn-data.xml FILE

Now undeploy the application from Admin Server and deploy it on the managed server with same settings keeping the system-jazn-data.xml intact(i guess deployment to managed server can be done even from WL Console but never tried it)

probably Dimitar Dimitrov speaks of the same stuff manually in the thread


Please share your thoughts on this issue if you face it


Wednesday, January 6, 2016

Solution to JBO-25014: Another user has changed the row with primary key oracle.jbo.Key[xxx].

I have posted this issue here

Simultaneous Commit operation in ADF throws "oracle.jbo.RowInconsistentException: JBO-25014"

Chris has discussed this issue in detail here

I have how tackled the solution and such implementation can be applied as turn around solution.

The real culprit is:

We know the record in the mid-tier has been changed by the user, however ADF doesn't use the changed record in the mid-tier to compare to the database record, but rather a copy of the original record before it was changed.  This leaves us to conclude the database record has changed, but how and by who?

So,  simple call execute operation for that viewObject after commit would solve the problem .
as:            
   OperationBinding op = getBindings().getOperationBinding("searchApplication");  //searchApplication is the method which populates the VO
    op.execute();

But would reset the iterator and even though the selected row in table is (says 5th from the top), the form would be always displaying 1st row.

So i deal with problem with variable defined as:
private String currentRowKeyStr="";
i would set this variable to
currentRowKeyStr=row.getAttribute("PrimaryKeyValue")!=null?row.getAttribute("PrimaryKeyValue").toString():"";

Similarly,
on the table selection listener
selectionListener="#{pageFlowScope.Bean.selectTable_SelectionListener}"

i would set this variable every time a row is selected as:
currentRowKeyStr=rowSelected.getAttribute("PrimaryKeyValue")!=null?rowSelected.getAttribute("PrimaryKeyValue").toString():"";

Please post comment in case you need help with such issue

Tuesday, July 14, 2015

Externalized Resource Bundle for ADF Application

Often we have to use resource bundle for our project which is a part of the project war.
Issue with this approach is when the war is specific to environment, for eg, if you need to provide different url for dev,prod,st and qa in your application, you need to create environment specific artifact and the same artifact can not be implemented across all the environment.

Solution to this approach is to externalize the resource bundle. The resource bundle would be the part of environment and the application would point to the location of the resource bundle instead of resource bundle being a part of the Application.

steps to implement the same:

1. create the property file with content(content is specific to this demo):

button_value=this text comes from property file
butoon_message=this message will be displayed on button click which comes from property file

and save it as TestMessage.properties in the local folder for eg:

C:\test\TestMessage.properties

while deploying the application in weblogic the path can be:
/web/TestMessage.properties

2. Mention the path's name in weblogic's start parameter.
I would define a system variable as TESTPROP_PATH and assign it the location as C:\test\TestMessage.properties for the example

To achieve this i have made an entry in
setDomainEnv file present in <UserFolder>\AppData\Roaming\JDeveloper\system11.1.1.7.40.64.93\DefaultDomain\bin

as:
set EXTRA_JAVA_PROPERTIES=-Djps.app.credential.overwrite.allowed=true -DTESTPROP_PATH=/test/TestMessage.properties %EXTRA_JAVA_PROPERTIES%

once set, this variable can be accessed from application as:

System.getProperty("AIMSPROP_PATH")

***please check with Environment team how to perform the step 2 for the environment


3. Now in your application you need to create a java class which would extend ListResourceBundle and fetch all the entries from the file as:

4. Make an entry for this class as <resource-bundle> in faces-config.xml

5. To access the resource bundle in jspx or jsff and entry has to be made in for f:loadBundle and can be used as:
6. Similarly, to use the resource bundle in java class can be used as:

the link to the demo application can be found here

steps 1 & 2 has to be performed individually to run the downloaded application


Please put in your comments in case of any doubts or suggestion to improvise this entry

Wednesday, February 4, 2015

Integrate your jdeveloper with FindBug Utility

FindBugs is an useful open source program which looks for bugs in Java code.It uses static analysis to identify hundreds of different potential types of errors in Java programs.Reports from find bug comes very handy when trying to sanitize your application code before moving to a production like environment. I took the help from link to use it as tool within my local jdeveloper. I will explain the same as step by step integration.

1. Download find bug zip from mentioned link, unzip it and place it in your local
2. Write the following xml file to use as ant build file  later

<?xml version="1.0" encoding="windows-1252" ?>
<project xmlns="antlib:org.apache.tools.ant" default="init">
<taskdef name="findbugs" classname="edu.umd.cs.findbugs.anttask.FindBugsTask"/>
  <target name="init">
    <tstamp/>
  </target>
  <property name="findbugs.home" value="C:/HPP/findbugs-3.0.0/findbugs-3.0.0" />
  <target name="findbugs">
    <findbugs home="${findbugs.home}" output="text">    
      <sourcePath path="${basedir}/src/java" />
      <class location="${basedir}/classes" />
    </findbugs>
  </target>

</project>

for this example saving the file as findbug.xml 

3. Now lets start with creating an external tool in jdeveloper. Go to Jdeveloper -- > Tool -- >External tool --> New
4. Select Apache Ant as Tool Type

5. Select the findbug.xml saved in step to as Ant buildfile

6. select findbugs as available target 

7. As mentioned in the build file, it expects a parameter named basedir which has to be added as project directory in this case


8 go with default options for options and process step


9. Make sure you point to findbug-ant.jar(available as<findbug_home/lib/findbug-ant.jar>) as class path entry


10. I am selecting it as Tool Menu in this case and making the availability as always


11. Select your project (either model or view, one at a time) and select FindBug from one of the option in Tool menu to generate the report


Please comment in case of any issues

Edit #1 : Findbugs 3.0 will work only with JDK 1.7. Choose the same in step 8


Friday, June 6, 2014

ERROR: No j2ee modules detected in EAR archive. Deployment aborted : Resolved!!!

While Deploying the Application using build.xml file, i encountered this issue :
  <exception msg="== ERROR: No j2ee modules detected in EAR archive. Deployment aborted. ==">
    <![CDATA[
    oracle.jdeveloper.deploy.VetoableDeployException: == ERROR: No j2ee modules detected in EAR archive. Deployment aborted. ==
  at oracle.jdevimpl.deploy.ear.EarDeployerListener.willDeploy(EarDeployerListener.java:113)
  at oracle.jdevimpl.deploy.fwk.ListenerSupport.fireWillDeploy(ListenerSupport.java:198)
  at oracle.jdeveloper.deploy.common.AbstractDeployer.deploy(AbstractDeployer.java:88)
  at oracle.jdevimpl.deploy.fwk.WrappedDeployer.deployImpl(WrappedDeployer.java:39)
  at oracle.jdeveloper.deploy.common.AbstractDeployer.deploy(AbstractDeployer.java:94)
  at oracle.jdevimpl.deploy.fwk.DeploymentManagerImpl.deploy(DeploymentManagerImpl.java:457)
  at oracle.jdeveloper.deploy.DeploymentManager.deploy(DeploymentManager.java:217)
  at oracle.jdevimpl.deploy.common.ModulePackagerImpl.deployProfiles(ModulePackagerImpl.java:86)
  at oracle.jdeveloper.deploy.common.ModulePackager.deployProfiles(ModulePackager.java:63)
  at oracle.jdeveloper.deploy.common.ModulePackager.deployImpl(ModulePackager.java:52)
  at oracle.jdeveloper.deploy.common.AbstractDeployer.deploy(AbstractDeployer.java:94)
  at oracle.jdevimpl.deploy.fwk.WrappedDeployer.deployImpl(WrappedDeployer.java:39)
  at oracle.jdeveloper.deploy.common.AbstractDeployer.deploy(AbstractDeployer.java:94)
  at oracle.jdeveloper.deploy.common.BatchDeployer.deployImpl(BatchDeployer.java:82)
  at oracle.jdeveloper.deploy.common.AbstractDeployer.deploy(AbstractDeployer.java:94)
  at oracle.jdevimpl.deploy.fwk.WrappedDeployer.deployImpl(WrappedDeployer.java:39)
  at oracle.jdeveloper.deploy.common.AbstractDeployer.deploy(AbstractDeployer.java:94)
  at oracle.jdevimpl.deploy.fwk.WrappedDeployer.deployImpl(WrappedDeployer.java:39)
  at oracle.jdeveloper.deploy.common.AbstractDeployer.deploy(AbstractDeployer.java:94)
  at oracle.jdevimpl.deploy.fwk.DeploymentManagerImpl.deploy(DeploymentManagerImpl.java:457)
  at oracle.jdevimpl.deploy.fwk.DeploymentManagerImpl$1.run(DeploymentManagerImpl.java:315)


    ]]>
    </exception>
    <status exitcode="4">FAILED</status>
  </deploy-task>
....
...

This issue occurs, if you do not specify the in the Application Assemble in the deployment profile as shown in the screen shot

Make sure you specify the Application Assemble in the deployment profile as per the Application's need